

Microsoft Dynamics CRM: Cascading Style Sheets Part 2 – Adding CSS to a CRM Form

In Part 1 of this blog, I covered the Basics with regard to CSS. This blog will walk you through the process of adding borders and colors to forms in CRM 2013 using a .css file (Cascading Style Sheets). Styles are normally saved in external .css files. External style sheets enable you to change the appearance and layout of all the pages in a Web site, just by editing one single file!
Note: Since this jscript call is to load the style, this does not actually interact with the form itself, or with any CRM element itself. Therefore, it is not something that would be overwritten by a CRM update. It is just instructions that get passed to the web browser.
Also note that this particular CSS was created for the forms built for a previous client. In order to change any of the colors and/or borders, you must understand CSS/HTML and web design.
Qualifications:
- You must have a basic understanding of Microsoft Dynamics CRM Customizations, Javascript and Style Sheets
- You must have System Administrator or System Customizer privileges in CRM in order to add CSS to your forms
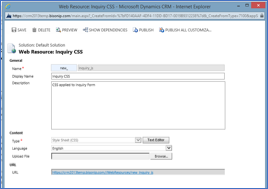
Create a Web Resource (CSS Loader)
- Create a new Web Resource called CSS Loader
- This web resource will be used for the OnLoad event for any form
- Choose the Type as Style Sheet (CSS)
- Click the Text Editor and enter the information below
- Save and Publish your Web ResourceData to be entered in Text Editor (copy/paste):
function LoadCSS(path) {
 var head = document.getElementsByTagName('head')[0];
 var link = document.createElement('link');
 link.rel = 'stylesheet';
 link.type = 'text/css';
 link.href = path;
 link.media = 'all';
 head.appendChild(link);
 }
Create a Second Web Resource (Form Specific)
- Create a new Web Resource for the specific Entity (form) you want to change
- Choose the Type as Style Sheet (CSS)
- Click the Text Editor and enter the information below (sample data below)
- Click “OK”Sample Data that can be entered in Text Editor (copy/paste):
.ms-crm-InlineEditLabel { white-space: normal !important; }
.ms-crm-InlineEditLabel .ms-crm-Inline-GradientMask { background-image: none !important; filter: none !important; }
.ms-crm-ListArea { border: 1px solid #999; width: auto !important; }
.ms-crm-Form-SubGrid-Layout-Lite { background: #FFFFCC; padding-top: 2px; border: 1px solid #999; border-bottom: 1px solid #ccc; }
#formHeaderContainer { border-top: 1px dotted #999; background: #FFFFCC; border-bottom: 1px dotted #999 !important; padding-left: 5px; padding-right: 5px; }
.ms-crm-InlineTabHeader { border-radius: 10px 10px 10px 10px; background: linear-gradient(to left, #0FFFFF, #a08050); border-bottom: 1px dotted #999 !important; padding-left: 5px; padding-right: 5px;}
.ms-crm-Inline-Value {border:1px solid #DDD; padding 2px; }
#nje_contacttype .ms-crm-Inline-Value, #subject .ms-crm-Inline-Value, #ownerid .ms-crm-Inline-Value, #lastname .ms-crm-Inline-Value{ border:1px solid #DC143C; }
#formHeaderContainer { border-radius: 10px 10px 10px 10px; background: linear-gradient(to left, #0FFFFF, #a08050); border-bottom: 1px dotted #999 !important; padding-left: 5px; padding-right: 5px;}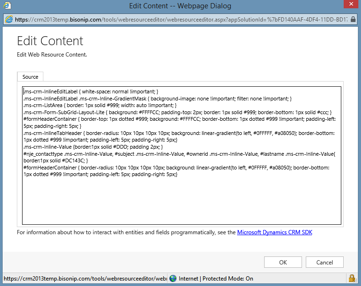
- Copy the URL that gets created for this Web Resource into Notepad for later use in setting the OnLoad function

Tips:
![]() Do NOT start an ID name with a number!
Do NOT start an ID name with a number!
![]() Do NOT start a class name with a number!
Do NOT start a class name with a number!
![]() Do not add a space between the property value and the unit (such as margin-left: 20 px;). The correct way is: margin-left: 20px;
Do not add a space between the property value and the unit (such as margin-left: 20 px;). The correct way is: margin-left: 20px;
CSS Text Editor Information
The following is some information about the lines in the CSS and what their function is:
- .ms is generic and used for multiple forms in CRM (not schema specific)
- # is used when referencing a specific field(s) (is schema specific)
- The following line gives the Form Header a gradient look with multiple colors:
- #formHeaderContainer { border-radius: 10px 10px 10px 10px; background: linear-gradient(to left, #0FFFFF, #a08050); border-bottom: 1px dotted #999 !important; padding-left: 5px; padding-right: 5px;}
- The following line gives the Tab Header a gradient look with multiple colors:
- .ms-crm-InlineTabHeader { border-radius: 10px 10px 10px 10px; background: linear-gradient(to left, #0FFFFF, #a08050); border-bottom: 1px dotted #999 !important; padding-left: 5px; padding-right: 5px;}
- The following line makes all Optionsets(picklist) and Yes/No (bit) fields blue
- .picklist, .bit { background: #87CEFA; padding:2px; }
- The following line makes all text box and Multi Line Text box fields have a border.
- .ms-crm-Inline-EmptyValue { border:1px solid #DDD; padding 2px; }
- The following line can make a specific fields have a red colored background
- #insert schema name .ms-crm-Inline-Value{ border:1px solid #DC143C; }
Note: Colors noted in the above Text Editor are HTML Web Safe colors (meaning that, regardless of your browser, the colors will appear the same). You can find the HTML Colors via this link: http://html-color-codes.info/ and the HTML Web Safe colors via this link: http://html-color-codes.info/web-safe-colors/
Add CSS Loader Web Resource to Form Library
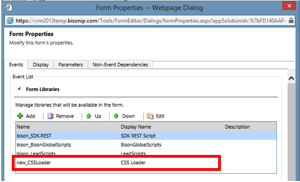
Add an Event Handler
- Choose Control = Form
- Choose Event = OnLoad
- Click Add
- Choose the library for the CSS you created for the Form
- Double-click your new Library to get to the Handler Properties

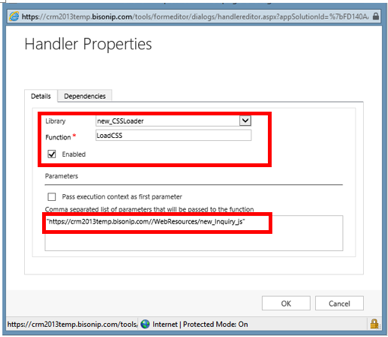
Update Handler Properties
- For Library, locate the CSS Loader web resource form the drop-down menu
- For Function, type LoadCSS
- Assure “Enabled” box is clicked
- In the Parameters section, use the URL that was created for the web resource you created for your second Form
- Add quotes at the beginning and end of the Parameter
- Click OK
- Click OK again on the Form Properties page
- Save and Publish your form
Note: You will not see the colors/borders in the Preview in the Form Editor. You must go to the actual form to see the changes.
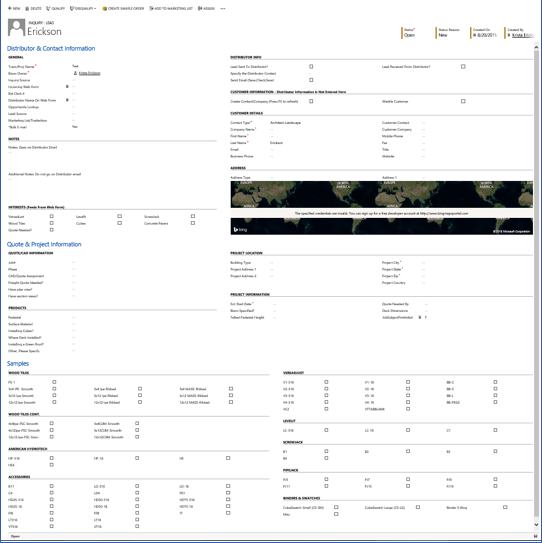
Form before CSS Has Been Applied
Form after CSS Has Been Applied
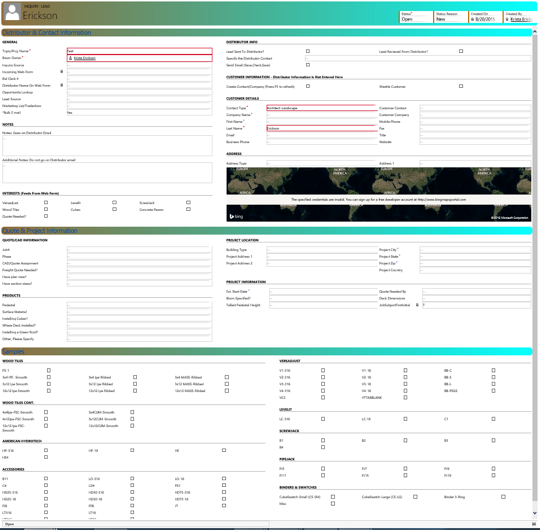
There ya go! Colorful forms in CRM using CSS!
Tags:
Related Posts
- Microsoft Dynamics 2016 Document Templates: Lessons Learned ( January 24, 2017 )
- Microsoft Dynamics CRM | Synchronous Workflows and Message Display ( April 13, 2016 )
- Microsoft Dynamics CRM 2016 | Get Smart with Intelligent Customer Engagement ( February 10, 2016 )
- Real-time (synchronous) Workflows to Display Alerts | Microsoft Dynamics CRM 2013 ( February 10, 2016 )
- ToolTips – How to Create End User Messages in Microsoft Dynamics CRM 2013 ( December 27, 2015 )
Recent Comments